Sunday, September 8, 2013

Hot, Hot, Hot Banana Peppers!


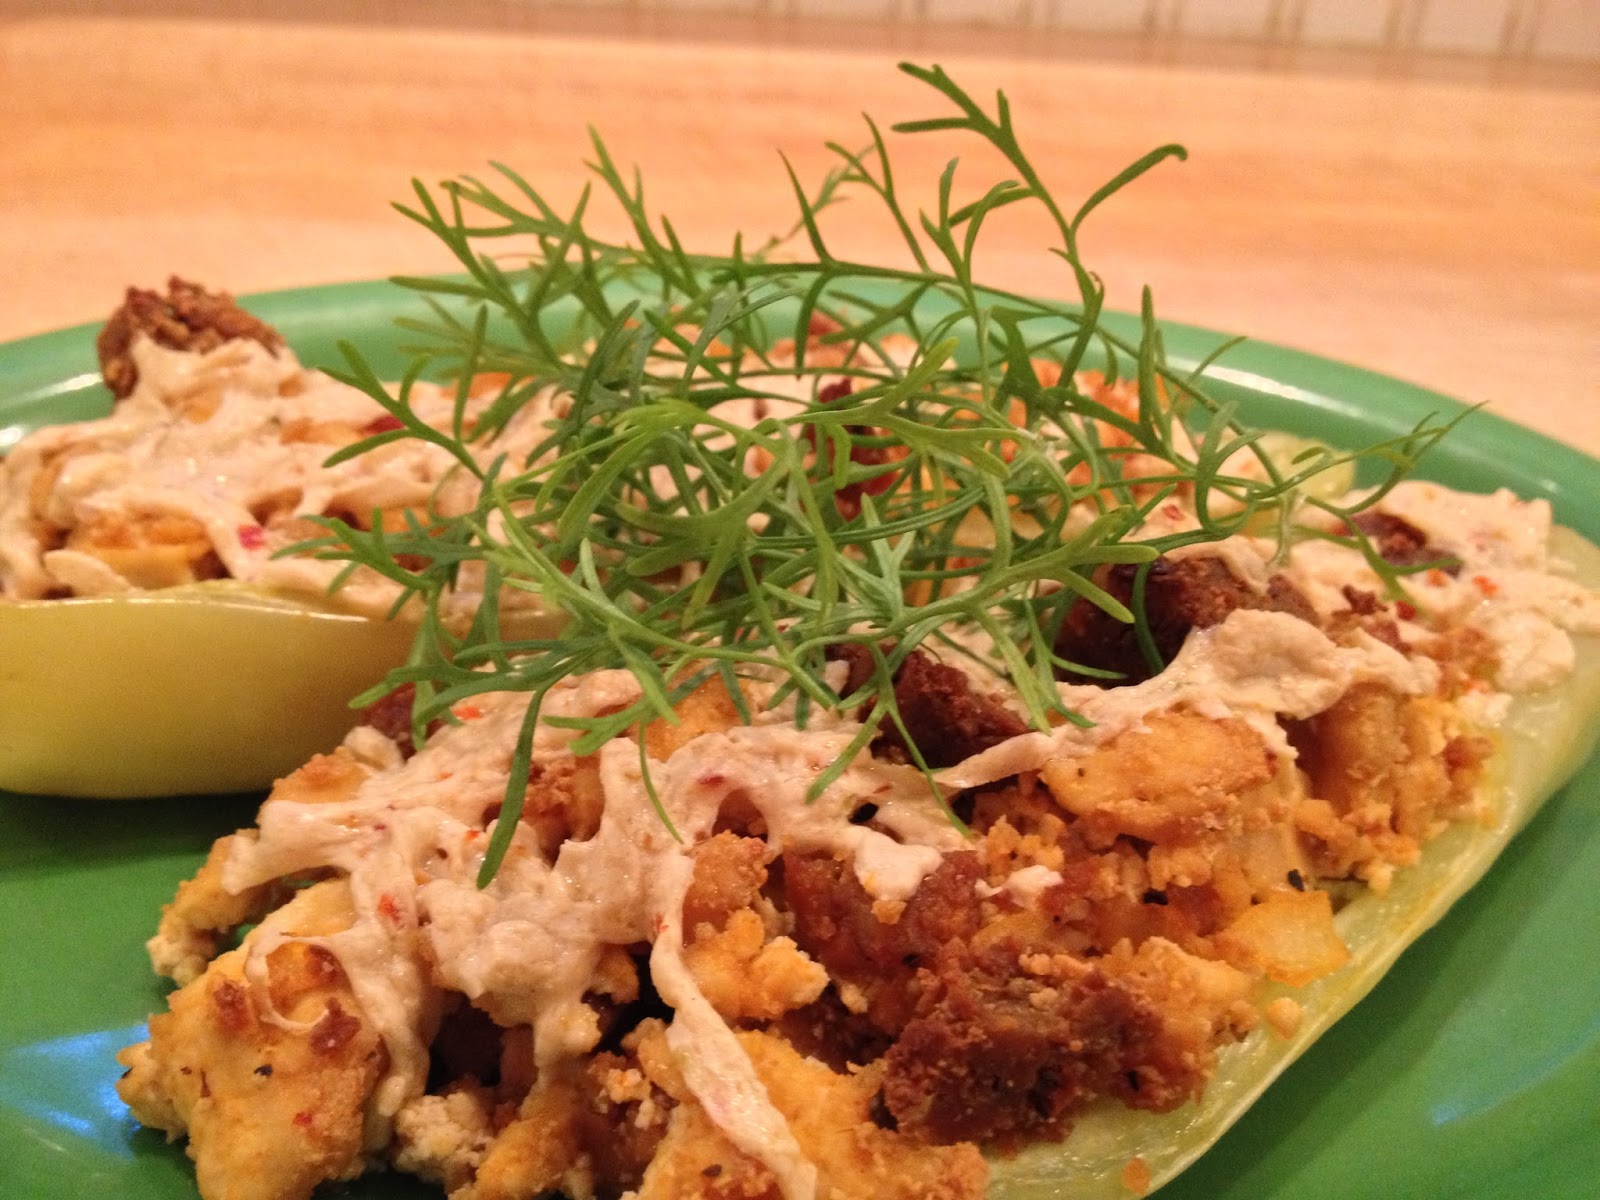
Chorizo Style Stuffed Banana Peppers
Warning! Warning! This recipe is HOT!  Banana Peppers can really vary in intensity and it turned out that mine put out a lot of heat.  Add to that the the mexican chipolte vegan sausage in the stuffing and you've got your self a recipe for a fire breather!  If you like spicy hot food, read on! 

On the plus side, this recipe is actually really simple to make.   It's just a crumble of Field Roast Mexican Chipolte Sausage, sautéed with onion, spices and scrambled tofu, placed atop banana pepper halves and topped with Daiya cheese. 

The ingredients you will need.
The Field Roast brand vegan sausages are excellent (and this from my very discerning, sausage-loving husband!) and the Daiya cheese is the closest thing to real cheese that I have yet found.  It contains no casein as some vegetarian "cheeses" do.  It melts and stretches and lends a creamy richness to veg dishes.   I am partial to the Daiya "pepperjack style shreds" as I think they have the most flavor.  Unfortunately, the Field Roast (as far as I know) is only available at Whole Foods and Daiya can be found at Whole Foods and a few other specialty stores around Pittsburgh that cater to alternative diets.  Eden Market in Mt. Lebanon, where I pick up my CRO bag, carries it.  You can of course substitute meat sausage and cheese for the vegan versions here.

Have lots of water ready!

Chorizo-style Stuffed Banana Peppers


4-6 Clarion River Organics Banana Peppers
2 links Field Roast Mexican Chipolte Sausage, crumbled or chopped
1 14 oz. pkg firm tofu, crumbled
1 yellow onion, diced
1 tbsp olive oil
1/2 tsp cumin
1/2 tsp oregano
1 large garlic clove, minced
1 package Daiya Pepperjack style shreds (or other vegan cheese)
sprig of fresh cilantro for garnish, optional
The prepped ingredients.

Preheat oven to 400.

Slice the top off of each banana pepper, cut in half and scrape out the seeds.  Arrange halves on a baking sheet that has been lined with parchment paper.  Set aside while preparing the stuffing.

Saute onion in oil 5 minutes, add spices and garlic and cook 2 more minutes.  Add sausage and cook until browned, about 5 minutes. Add crumbled tofu and continue to cook 5 more minutes.  Spoon the stuffing onto each banana pepper half.  Don't worry about the messiness of this, it won't sit on top of each half perfectly but that's okay.  Just let it spill over and you can scrap off the filling onto the plates when serving.  Bake 15 minutes.  Remove from oven and top each with Daiya shreds and return to the oven to melt the Daiya 5-8 more minutes.  Serve at once garnished with cilantro sprigs if desired.  Serves 4.  

Thursday, September 5, 2013

Week 14 - Heirloom Tomato, Green Beans, Potatoes, Mustard Greens

Green Bean, Potato, and Mustard Green Curry

Technically this is a week 13/14 recipe since two of the above ingredients were in last week's delivery.  I still had the green beans and potatoes from last week and when I saw the greens this week I decided a curry was in order.

A curry does not actually mean that a dish is made with the Indian spice, curry powder.  It is a generic term that simply refers to a "meat" and vegetable dish in a gravy-like sauce.  Typically, you will find curries in Asian restaurants made with coconut milk and a variety of vegetables with the option of chicken, beef, shrimp or tofu.  Naturally, I made this one with tofu. 

Mustard Greens can be quite hot and spicy and when raw a little goes a long way.  But when you cook them with a little salt and fat, they will become far milder and can be used interchangeably with other greens in recipes such as spinach or collards.  

The quantities of potatoes and beans here are just approximate - use whatever you received in your share.

 Enjoy!


Green Bean, Potato, and Mustard Green Curry

1 Tbsp olive oil
1 Clarion River Organics Heirloom tomato
1/2 tsp sea salt
1 tsp ground turmeric
1/2 tsp mustard seeds, smashed* 
3/4 tsp crushed red pepper (this amount will make it medium spicy, so cut back if you don't want your curry too hot)
1/2 cup water
3/4 lb Clarion River Organics potatoes, peeled, and cut into 1/2 inch cubes
1 package extra firm tofu, cut into 1/2 inch cubes
3/4 lb Clarion River Organics green beans, trimmed and cut into 2-3 inch pieces
1 13.5 oz. can coconut milk
1 bunch Clarion River Organics mustard greens, washed, tough stems removed, and chopped

Cut tomato into several chunks and place in a blender or food processor and whirl until tomato is pureed.

Place oil and tomato puree in a medium pot on medium-high heat and cook for 1 minute. Add salt, turmeric, smashed mustard seeds and crushed red pepper, stir and saute for 3 to 4 minutes.  Stir in water, potatoes, and tofu and bring to a boil. Reduce the heat to low, cover and cook for 10 minutes.

Remove the lid and stir in the green beans and 1/2 can of the coconut milk. Raise the heat and return to a boil.  Once boiling, reduce heat to low and cover and cook an additional 8 minutes, or until potatoes and beans are cooked through.  Stir in remaining coconut milk and increase heat to medium. Bring to a boil again, then stir in mustard greens, cover and reduce the heat to low. Cook for 2 minutes, or until mustard greens are wilted. Serve immediately with a side of brown rice (about 1 cup of cooked rice per person should do it).  Serves 4.

*To smash the mustard seeds, place them between sheets of wax paper and use a meat mallet or other heavy object to pound them to a grainy texture.

Wednesday, September 4, 2013

Calling All Kale Haters!

Kale Salad with Creamy Avocado and Ginger-Almond Dressing
This is directed at those of you out there who feel as some CRO survey respondents did that kale is a "least enjoyed" CSA item and you have "changed your mind for the worse" about kale.    I would love to change your mind for the better.

I must admit that when I first started to receive kale as a member of another CSA years ago, I was not a fan.  In fact, and I hate to admit this, I can recall throwing out entire bunches of kale.  If this is you, then read on.

Kale is one of the most nutritious vegetables out there.  It scores a perfect 1000 on the ANDI scale (Aggregate Nutrient Density Index).  It is an excellent source of vitamin K (a somewhat elusive vitamin).  The recommended intake of vitamin K is about 100 mcg a day.  A half cup of kale has more than 500 mcg!  And my recipe below has far more than a half cup of kale.  Kale boosts the immune system.  It is also a good source of beta-carotene and other carotenoids, vitamins A and C, lutein, and calcium.  It is part of the cabbage family and as such is a cruciferous vegetable which means it has cancer-fighting properties.  

Sadly, the average American consumes only 1 cup of kale a year!  They must feel like some of the CRO subscribers, that kale is well...yucky!  Now I know some of you cannot conceive of eating a salad of the size I have photographed and provided a recipe for here, but trust me, if you are serious about eating for health, and you make this your entree, you can eat it!

Recently, I had a wonderful kale salad at Blossom Cafe in New York City.  I have created my own version of that salad here.  The thick creamy dressing coats and softens the leaves and adds a real boost of flavor to what I guess some of you consider to be a boring or bland green!  If we get another round of kale in our shares I will give you a soup recipe that may also change your mind about kale.  Stay tuned Kale Haters!

Kale Salad with Creamy Avocado and Ginger-Almond Dressing

For the salad:
1/2 bunch Clarion River Organics kale, tough stem and rib removed, chopped into bite sized pieces
1/2 Clarion River Organics tomato, sliced and julienned
1/2 Clarion River Organics green pepper, diced
1 Clarion River Organics carrot, julienned or shredded
1 can cannellini beans, drained and rinsed

For the dressing:
1/2 cup raw almonds
2 ripe avocados, skin and pit removed
juice of a lemon or lime
1/4 cup tahini
1 medium garlic clove, smashed or roughly chopped
1 1/2 piece of ginger, peeled and grated
1/4 tsp chili powder
1/2 to 1 cup water*

First make the dressing: Place almonds in a blender or food processor and blend until almonds resemble a fine powder.  Add all other dressing ingredients except water and process until creamy.  With motor of food processor or blender running add only as much water as necessary for dressing to have the consistency of mayonnaise.  

Combine all the salad ingredients in a large bowl.  Add 3/4 cup of the dressing and toss to combine thoroughly coating every piece of kale.  Allow salad to sit for at least 30 minutes.  The longer it sits the more tender the kale becomes.  Serves 2 as an entree.

*For a more tangy dressing use half rice vinegar and half water.

Monday, September 2, 2013

Week 13 - Spaghetti Squash, Tomatoes, Green Pepper

Warm Squash and Tomato Salad
Whew!  What a week it's been.  Taking our daughter back to college and a family wedding all in six days.  No time to cook!   I am getting a little backed up on produce so I've taken to just eating some of it raw (green pepper strips, tomato slices with a little salt on them, handfuls of blueberries), but I did manage to put together a nice little dish last night that used three of this week's veggies.  I served this as our main course at dinner with a baked potato.  It is a very simple and versatile preparation and will serve four generously.  

Warm Squash and Tomato Salad

1 Clarion River Organics Spaghetti Squash
1 onion, sliced or diced
2 large cloves of garlic, minced
3 Clarion River Organics Tomatoes, chopped
1 Clarion River Organics Green Pepper, seeded and diced
Any or all of the following herbs: dried oregano, basil, marjoram, thyme,  red pepper flakes and/or rosemary; fresh parsley, cilantro,
Juice of a lemon
Salt and Pepper to taste

Preheat the oven to 350.  Cut squash in half lengthwise and scoop out seeds (save seeds to roast.  Instructions can be found here:  To Roast Squash Seeds.)  Place squash halves flesh side down on a cookie sheet and bake for 45 minutes or until a knife can be inserted into them easily.  

Meanwhile, make your herb mixture.  Combine any or all of the herbs listed to make 5 teaspoons total.  Set aside.  In a large skillet saute onion and garlic over medium heat for 5 minutes in 2 tablespoons water.  Add tomatoes, green pepper, herb mixture, and lemon juice and cook 7-8 more minutes.  Season with salt and pepper, remove from heat, and set aside.

When squash is done, remove them from oven and allow to cool until they can be handled without burning yourself!  Using a spoon, scoop out the stringy flesh from each squash half into a large bowl.  Discard the squash skin.  Add tomato mixture to the squash in the bowl and toss all together.  Serves 4 as an entree.

Serving suggestion: Serve over smashed baked potatoes.  
Variation:  Add 1/2 cup chopped kalamata olives with the tomatoes.

Thursday, August 22, 2013

Week 12 - Tomatoes, Orange Peppers, Carrots, Shallot, Jalapeño Pepper

These Clarion River slicing tomatoes may be just about the best I've ever eaten!  They are juicy, sweet and firm.  Because their taste seems to be at its peak I felt like just eating them raw.  But that would make for a boring post so I decided to make a favorite summer sandwich of mine: The "Not Queso"dilla.  The fresh vegetables stay crisp and are just ever so slightly warm in this vegan take on a classic Mexican favorite.  The amounts given are what I would use, but if you like more or less of any ingredient just adjust according to your liking.  If you get a cheese share from CRO you could use that in place of the vegan "cheese".  Serve with a side of fresh fruit and you've got yourself a meal!


"Not Queso"dillas

2 whole wheat, corn or rice flour tortillas
1/2 package Daiya brand pepperjack style shreds (or about 1 cup shredded cheese)
1 Clarion River Organics medium-sized slicing tomato, sliced and then slices cut into quarters
1 Clarion River Organics orange pepper, seeded and diced
1 Clarion River Organics carrot, shredded
1 small Clarion River Organics shallot, diced
1/2 of a Jalapeno pepper, seeded and minced (from Week 8 if you still have yours)
2 tsp chopped cilantro, optional

Divide the Diaya "cheese" shreds in half and cover 1/2 of each tortilla with it.  Layer all other ingredients on top of the cheese, dividing evenly between the two tortillas.  Fold the uncovered half of the tortilla over the filling and press down.  Heat a large skillet over medium heat and spray with cooking spray.  Fry the sandwiches for about 5 minutes on each side or until lightly browned turning carefully so that the filling does not fall out.  Serves 2 as an entree with a side of fruit or small tossed salad.


Monday, August 19, 2013

Week 11 - Tomatoes

One of the easiest things you can do with tomatoes (besides just slicing them on to sandwiches!) is to make bruschetta.  Bruschetta (pronounced bru-sket'-a) is an Italian appetizer where the main ingredient is thick Italian bread that has been brushed with olive oil, grilled or toasted and then rubbed with garlic and salt.  You can then top it with whatever you like, but tomatoes are nearly always part of the mix.

I am not a fan of 100% white bread.  In fact, I almost never eat it simply because all the goodness has been stripped from the wheat and it really is empty calories.  Unfortunately, store bought Italian bread will most likely be of this variety.   For my bruschetta, I made a spelt flat bread dough in my bread machine (recipe given below), but you could use whatever you like - even crackers if you don't want to go to the trouble of grilling/toasting bread or making the flat bread.  However, I do think the olive oil, garlic and salt adds quite a bit of taste to the finished product.

Tomato-Lentil Bruschetta Appetizers

2 Clarion River Organics Tomatoes, diced
1 can lentils, drained and rinsed (or 1 1/2 cup cooked lentils)
1/2 cup kalamata olives, chopped
1/4 cup fresh basil leaves, snipped or chopped
2 cloves garlic, 1 sliced in half, 1 chopped
1 Tbsp olive oil
salt to taste
10 slices thick italian bread (or see Spelt Flat Bread recipe below or just use crackers)

Combine the tomatoes, lentils, olives, basil, and the chopped garlic clove in a large bowl.  Brush the olive oil on the slices of bread and toast bread in oven at 400 for 6 to 8 minutes, turning once,  or until lightly browned (or broil for 2 to 4 minutes turning once).  Rub the garlic halves, cut side down, on the bread slices (or on the spelt flat bread squares) and sprinkle with salt to taste.  Cut each bread slice in half.  Chop the garlic clove that you used to rub the bread and add it to the tomato mixture in the bowl.  Top each bread slice (or spelt square) with a generous amount of the bruschetta.  Makes 30 spelt square appetizers or 20 bread appetizers.

Spelt Flat Bread

Add the following to your bread machine in the order listed:

1 cup water
2 Tbsp. olive oil 
1 1/2 tsp salt
1 1/2 cups Spelt flour
1 1/2 cups bread flour
2 1/4 tsp yeast (or one packet)
extra olive oil for brushing top

Set bread machine to dough setting.  When dough is ready, roll out on a cookie sheet or pizza stone into a 10 x 12 inch rectangle.  Brush top with 1 Tbsp olive oil.  Bake 10 minutes at 450.  Cool slightly and cut into two inch squares.


Sunday, August 18, 2013

Cantaloupe Juice

Did you know that cantaloupe is the most nutrient dense of all fruits?  It is very low in calories, yet contains huge amounts of vitamins A and C and is a good source of potassium and folate as well as many other nutrients*.  That's why many people like to juice it instead of eating it.  To get the maximum benefit, juicing gurus suggest drinking cantaloupe juice straight without mixing in other ingredients.

Juicing in its strictest sense means to extract the liquid juice from the fruit or vegetable and leave all of the fiber behind.  The theory is that the juice contains 90% of a fruit or vegetable's nutrition.  Because you could not eat 10 oranges in one sitting, but you could easily consume the juice of 10 oranges in one sitting (about 2 1/2 cups) you are getting a super dose of nutrients when you extract juice from a large quantity of fruit/vegetables.   In terms of nutrients, it is nearly the equivalent of eating 10 oranges!  Juice extraction can only be done in a "juicer", not in a blender. That is, a machine designed to separate the juice from the pulp.  A blender would liquefy the fruit but you would be left with all the fiber and because fiber quickly fills us up, it would be difficult to consume more than a typical serving of the fruit or vegetable.
  
I was asked recently by Zeb, one of the managers at Clarion River Organics, if people who are into juicing would be interested in frozen cantaloupe in the winter for juicing purposes.  I believe they would be (I would be), but my only reservation was how the juice would come out once the fruit had been frozen.  To find out, I conducted a little experiment.  The answer: surprisingly well!  

This week I juiced about 2 cups of fresh cantaloupe and 2 cups of frozen cantaloupe that I had reserved from our week 10 delivery.  I allowed the frozen cantaloupe to thaw before juicing it.  As you can see from the photo below, the juices looked identical and they tasted identical as well.  So should you find yourself unable to eat all the cantaloupe this week, just cut the fruit from the rind (*see note below), dice into chunks, place in serving size plastic bags (about 1 1/2 - 2 cups per bag) and throw in your freezer.  Now in the fall and winter you can drink some fresh cantaloupe juice and you will think it is summer again!  
Left: Juice extracted from FRESH cantaloupe
Right: Juice extracted from FROZEN cantaloupe
The glasses look identical!
The Juicer I used for this experiment: the Breville 820XL

*For more information on the health benefits of cantaloupes and information on juicing them see this entry from The Juice Nut's website.
*Note: Some say you can juice the rind as well, but since cantaloupe has one of those bumpy skins where bacteria may hide even after washing, I am a bit reluctant to do that.  According to The Juice Nut website, to get the maximum nutritional benefit you should peel off the outermost layer of skin leaving as much of the green as possible, though they say that even this step is not necessary if the fruit is organic.